How I Setup my Macs for Python Development
I've been asked about this a few times already this month so I've decided to write down what I do to set up a new Mac for (mainly) Python Development.
First, Install Dropbox and Sync Folders
I keep my development folders on Dropbox as this gives me some degree of machine independence. More recently, I've also started to keep my dotfiles on Dropbox and use MackUp to handle the syncing of the dotfiles between machines. MackUp is a pretty straight forward symbolic linking system and it basically does what I would have done if I had rolled my own utility. Be aware though that Mackup's default behavior is to put your .ssh folder and its contents on Dropbox. If you don't like this behavior then it must be overridden manually. I always start by installing Dropbox and syncing my Development folders, as I typically have lots of stuff of on Dropbox so it takes a while to sync everything. You may want to consider using the Selective Sync feature to control the syncing process.
Upgrade your Terminal: Install Iterm 2
You're going to need a decent terminal application for your command line work. While the bundled OS X terminal application has gotten a lot better with recent releases of the OS X it still has a way to go to match Item2. Some of the many features of Iterm are listed here. So use Item2 as your terminal.
Install XCode: You'll need at least the Command Line Tools
You need to install either the full version Xcode or at least to the Command line tools. These can be actually installed from the command line by entering the following in you terminal window
xcode-select --install
You will then be prompted to either install the full Xcode or just the command line developer tools, with the latter being the default. Once you’ve installed one or the other, you can proceed to installing Homebrew.
Install Homebrew
Homebrew is a package management system that simplifies the installation of libraries, tools and utilities you typically need for development. Homebrew is actually a Ruby application and to install it just visit the Homebrew homepage copy and paste the code listed under Install Homebrew into your terminal. The install snippet changes occasionally and it is currently
ruby -e "$(curl -fsSL https://raw.github.com/Homebrew/homebrew/go/install)"
But be remember to visit Homebrew homepage to get the correct code snippet. Next run
brew doctor
and then
brew update
Then to install some packages to make sure everything works
brew install ssh-copy-id git mercurial mackup
Set Up Your Shell Environment
I'm a convert to Zsh or really oh-my-zsh. However, the same would apply if you used bash or any other shell If you are using the bash shell then edit your bash_profile
vi ~/.bash_profile
or for oh-my-zsh
vi ~/.zshrc
Add the following lines
# set the architecture flags
export ARCHFLAGS="-arch x86_64"
# Ensure that local bin is first in path
export PATH=/usr/local/bin:$PATH
These changes will take effect the next time you restart the shell. Rather, than restarting your shell simply type the following in the terminal.
source ~/.zshrc
or if you are using bash
source ~/.bash_profile
Use the Homebrew Python
Apple has always bundled Python along with its OS releases. However, we advise you not to use the bundled Python for development and instead to install Python via homebrew. We prefer the brew Python for a number of reasons including :
- Apple makes changes to its bundled Python and this can gives rise to bugs and incompatibilities.
- If you use the bundled Python you can upgrade to the latest and the greatest version of OS X you may find that your packages, virtualenvs etc. may all need to be reinstalled and recreated
- As new versions of Python are released, the bundled Python becomes more and more out-of-date. Homebrew will allow you the upgrade to the most recent versions of Python (2 or 3).
- Homebrew allows you to easily play around with Python 3 as it comes with pip3 for installing packages
To install Python with homebrew enter
brew install python
And optionally install Python 3
brew install python3
Install VirtualEnv and VirtualEnv Wrapper
A Virtual Environment, is an isolated working copy of Python and installed packages that allows you to work on a specific project without the worry of affecting other projects.
The virtualenv package allows you to create virtual environments while the virtualenvwrapper package provides a framework for organizing your virtual environments. Install them using pip
pip install virtualenv

pip install virtualenvwrapper
Next, create a directory to store your virtual environments
mkdir -p ~/virtualenvs
We’ll then edit the ~/.zshrc file or (.bashrc or .bash_profile)
vim ~/.zshrc
and add the following lines to it
# cache pip-installed packages to avoid re-downloading
export PIP_DOWNLOAD_CACHE=$HOME/.pip/cache

export WORKON_HOME=$HOME/virtualenvs
source /usr/local/bin/virtualenvwrapper.sh
Restart your terminal or type the following in the terminal window
source ~/.zshrc
or
source ~/.bash_profile
Next, we want to test out your setup by building a C based python package. Start by installing some shared libraries via brew
brew install libjpeg lcms libtiff libpng freetype
Next create a test virtualenv and install the C based python package in this case Pillow which needs to be built against the shared libraries that you just installed using brew
mkvirtalenv test-env
pip install Pillow
Everything is fine if you get a post install message like similar to the one shown below
PIL SETUP SUMMARY
--------------------------------------------------------------------
version      Pillow 2.4.0
platform     darwin 2.7.6 (default, Apr  9 2014, 11:48:52)
             [GCC 4.2.1 Compatible Apple LLVM 5.1 (clang-503.0.38)]
--------------------------------------------------------------------
--- TKINTER support available
--- JPEG support available
*** OPENJPEG (JPEG2000) support not available
--- ZLIB (PNG/ZIP) support available
--- LIBTIFF support available
--- FREETYPE2 support available
*** LITTLECMS2 support not available
*** WEBP support not available
*** WEBPMUX support not available
Extras
PostgreSQL
You can of course use homebrew to install PostgreSQL. However, I've found that that it takes a lot of manual tweaking to get all the procedural languages (PL/pgSQL, PL/Python, PLV8 etc.) as well as extensions like PostGIS, hstore etc. working. In contrast, Postgresapp pretty much works out of the box and gives you stable, up-to-date version PostgreSQL/PostGIS pretty much configured for any kind of development that you are likely to do. Postgresapp also comes with the full set of PostgeSQL/PostGIS command line tools however, you need to add the bin directory to your path. As before, depending on you shell of choice add the following to your .zshrc , .bash_profile or .bashrc
PATH="/usr/local/bin:/Applications/Postgres.app/Contents/MacOS/bin:$PATH"
Restart you terminal app or type the following in the terminal window
source ~/.zshrc
or if you use another shell example bash
source ~/.bash_profile
Finally, test out your setup by typing
createdb test-db #create a new database
psql test-db
dropdb test-db
Install a GUI Version Control Client
While we can use Homebrew to install source control tools (i.e git and or mercurical) many new developers, or those coming from backgrounds in design can sometimes feel a bit intimidated by using git and mecurical from the command line. So to help them get over the hump we usually recommend they also install a free git and mercurial GUI client such as SourceTree.
Python Data Tools
Python is becomming more and more popular for statistics, data analysis and data science tasks. In particular you may be interested in in developing solutions using the SciPy stack and using tools like IPython, Matplotlib, Pandas , scikit-learn , etc. The usual recommendation is to use a binary distribution such as Anaconda or Enthought Canopy, but as a developer you will want/need to use the source distribution. Start by adding these lines to your .zshrc or .bash_profile.
export CFLAGS="-arch i386 -arch x86_64"
export FFLAGS="-m32 -m64"
export LDFLAGS="-Wall -undefined dynamic_lookup -bundle -arch i386 -arch x86_64"
export CC=gcc
export CXX="g++ -arch i386 -arch x86_64"
This should take care of problems you can sometimes encounter in building some numpy and scipy extensions.
Next install some of the perquisites libraries and applications using homebrew.
brew install gfortran pkg-config zeromq readline
Then install numpy and scipy using pip. We will also install nose so we can run the test suite.
pip install numpy
pip install scipy
pip install nose
Note, I'm installing these packages directly to the system site packages i.e. in /usr/local/lib/python-2.7/site-packages as opposed to a particular virtualenv as I often use pydata packages for ad-hoc hacking and experimentation. You can run the test suite by starting Python and running
import scipy
import numpy

numpy.test()
scipy.test()
Almost all the numpy test should pass but interestingly there will be quite a few known failures with scipy. This should not be a problem
Next install pandas
pip install pandas
Then we can install IPython (including support for the IPython notebook) , as well as matplotlib and the ipython sql extension which allows you to to connect to a database and then issue SQL commands within IPython or IPython Notebook.
pip install jinga2
pip install ipython pyzmq tornado pygments
pip install matplotlib
pip install pycopg2
pip install ipython-sql
Check that everything is setup properly by launching the IPython notebook with matplotlib integration.
ipython notebook --pylab=inline
Here is a sample session from notebook I created
Start by importing pandas and load the sql magics
import pandas as pd
%load_ext sql
Connect to a PosgreSQL database with data from the Trinidad and Tobago stock exchange and execute sql
%%sql postgresql://localhost/mass-db
select sd.dateix, s.ticker, sd.close_price, sd.volume from markets_symboldata sd, markets_symbol s
where s.id=sd.symbol_id order by sd.dateix desc limit 10;
10 rows affected.
| dateix | ticker | close_price | volume |
|---|---|---|---|
| 2014-01-27 00:00:00-04:00 | NCBJ | 1.0 | 1901965 |
| 2014-01-27 00:00:00-04:00 | RBL | 116.52 | 8109 |
| 2014-01-27 00:00:00-04:00 | GHL | 14.0 | 4294 |
| 2014-01-27 00:00:00-04:00 | JMMB | 0.49 | 18500 |
| 2014-01-27 00:00:00-04:00 | NEL | 18.25 | 1348 |
| 2014-01-27 00:00:00-04:00 | NFM | 0.96 | 15500 |
| 2014-01-27 00:00:00-04:00 | AHL | 11.0 | 1000 |
| 2014-01-27 00:00:00-04:00 | FIRST | 42.4 | 3891 |
| 2014-01-27 00:00:00-04:00 | CIF | 22.75 | 3210 |
| 2014-01-27 00:00:00-04:00 | SBTT | 73.12 | 624 |
Execute another query using the connection established above to retrieve the last 100 days of data for GHL. Store the result in a variable called results
result = %sql select sd.dateix, s.ticker, sd.close_price, sd.volume from markets_symboldata sd, markets_symbol s where s.id=sd.symbol_id and s.ticker='GHL' order by sd.dateix desc limit 100
100 rows affected.
Because pandas is available we can use the DataFrame method to create a DataFrame from the resultset
df = result.DataFrame()
df.info()
<class 'pandas.core.frame.DataFrame'>
Int64Index: 100 entries, 0 to 99
Data columns (total 4 columns):
dateix         100 non-null object
ticker         100 non-null object
close_price    100 non-null float64
volume         100 non-null int64
dtypes: float64(1), int64(1), object(2)
Convert the df to a time series by setting the index to the dateix
df.set_index('dateix', inplace=True)
Statistical summary of the closing price and volume
df.describe()
| close_price | volume | |
|---|---|---|
| count | 100.000000 | 100.000000 |
| mean | 14.806300 | 11008.670000 |
| std | 0.902168 | 16633.468579 |
| min | 13.500000 | 21.000000 |
| 25% | 14.000000 | 1718.750000 |
| 50% | 14.975000 | 4447.000000 |
| 75% | 15.600000 | 12569.250000 |
| max | 16.450000 | 82430.000000 |
8 rows × 2 columns
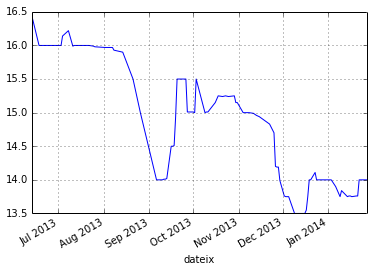
Use matplotlib to plot the closing price
df['close_price'].plot()
<matplotlib.axes.AxesSubplot at 0x11650bcd0>